Wednesday, September 29, 2010

Pretzel Bites

These pretzel bites were awesome!! Perfect for a day of football and appetizers--we all loved them. They are also from Pennies on a Platter. She also has a version filled with ham and cheese, which sounds like something you can't possibly go wrong with!
They are even easy to make! It's a yeasted dough, but there isn't any kneading required. I made the dough the night before, refrigerated it overnight, then rolled, cut, boiled, and baked the morning of. They reheated perfectly, too. Norris wanted some ballpark/concession stand cheese, so I put that in the middle, and they were gone in no time! The only thing I would change for next time (and there will be a next time!) is brushing a little less butter on them. I melted the 1/4 cup called for, and used about 3 Tbsp total, and feel like I should have used more like 2 Tbsp total. I didn't have pretzel salt, so I used sea salt, and it did the same trick.


(I followed her directions exactly, so I'm just linking you!)

Tuesday, September 28, 2010

Norris' New House!

Norris built his own new house!!

Well, not quite, but when I went out to see his progress, it looked as though he'd built a house. It's really a hunting blind, and maybe, just maybe, I will spend a day in the field reading while he watches for his prize.

Monday, September 27, 2010

Buffalo Chicken Bites

After seeing these on multiple blogs I like to read, I decided we better try them for a football Saturday. I got the version I used from Pennies on a Platter, who quotes all of her sources if you'd like to see :) They evolved from a deep-fried concoction to a crushed cornflake covered baked item. I used the chicken I cooked overnight to make these. I wound up freezing a ton of them, which will be perfect for our next get-together. Maybe we'll even try them deep-fried the next time we have a fish fry! The only thing I would change for next time is to make even smaller balls out of them. The inside is almost a dip-like consistency when they first come out, although it sets up as they stand. I think if they were even smaller, the ratio of inside to surface crunch would be just perfect!Buffalo Chicken Bites

Yield: 44 medium sized bites (I would say you'd need 3-4 per person as an appetizer if you had two other appetizer options)

~5 cups shredded cooked chicken (I cooked a 4 lb chicken, skinned and deboned in, then shredded it in my food processor (basically ground) and it yielded about 5 cups
~3/4 cup mild buffalo wing sauce (adjust to your own tastes)
5 oz softened low fat cream cheese
2 cups shredded sharp cheddar cheese
1/4 cup sliced green onions or chives, optional
1 cup all purpose flour
4 eggs, beaten
4 cups Cornflakes, crushed

Preheat oven to 350 F (if baking same day). Line a baking sheet with a Silpat or parchment paper.
Combine chicken, cream cheese, and hot sauce. Stir in cheddar cheese and green onions.
Use a small scoop in order to make even bites. Scoop and roll into a small ball. (I rolled them all and put them on a plate, then dipped them all at the same time)
Make a line up of 3 shallow bowls or pie plates. Put the flour in the first, the egg in the second, and the crushed cereal in the third. Put the baking sheet by the cereal.
Dip chicken ball into the flour, then egg, then cereal, then place on baking sheet. (Always use one hand to dip in the flour and toss into the egg, the other hand to actually dip and remove from the egg and toss into the cereal, and back to the first hand to roll in cereal and place on sheet so that you don't find yourself washing your hands after every two dips!)
Bake for 25 minutes. Serve warm with ranch or bleu cheese dressing!

A tip from Pennies on a Platter: If you're freezing them, go all the way up until where you're ready to bake them (but don't bake!). Place the baking sheet in your freezer for about 20 minutes, then transfer the chicken balls to a freezer bag (same method with freezing cookie dough). To bake, place the frozen chicken balls back onto a lined baking sheet and bake at 350 F for 25 to 30 minutes.

Sunday, September 26, 2010

Crockpot Roasted Chicken

If you want tender, fall of the bone chicken without heating up your whole house with your oven (or done while you're at work!), this is the recipe for you! I just combined a bunch of different ideas I saw for this, so I'll type out what I wound up using. This is the easiest way to roast a chicken, considering clean up takes about 2 minutes! I put this in the crockpot, went to bed, and woke up to a great smelling kitchen and perfectly cooked chicken.
Just be certain your chicken actually fits into your crockpot--I was so bummed when I tried to put mine in my smaller one and it was like me trying to fit into size 2 jeans...more than a little tight!:) Luckily Norris reminded me of a larger one we had in the garage!

Crockpot Roasted Chicken
1 whole chicken (about 4 lbs.)
~3/4 cup chicken broth
3 garlic cloves, peeled
any seasonings you like
olive oil
foil
Prepare your chicken by cleaning out the inside (there is normally at least neck in there..Grandma, that doesn't scare me anymore, fortunately:). Save it for making stock sometime if you want!
Roll up three foil pieces into balls. This is so your chicken isn't touching the bottom of your crockpot and burning. Place them in a triangle pattern on the bottom of your crock.
Pour in the chicken broth and garlic cloves, then place your chicken on the foil balls. Rub it down with olive oil and any seasonings. (at least salt and pepper!!)
Cook on low for 8.5 to 9 hours. When you pull it out, it will be falling off the bones tender!
So tender and good smelling that if you have dogs, you should put them outside:) Don't worry, there wasn't any countertop licking involved. But look at Bear's face (if you can find the dark knight in the picture)--I think he thinks he got caught!

Friday, September 24, 2010

Barbecue Cups

Every week, when I make the grocery list, I ask Norris what he wants on it, and I pretty much always get the same answer. This time, he had a some dinner requests, including chipped beef on toast, spaghetti with clam sauce, and barbecue cups. I decided I'd do one a week for the next few weeks, so I'm starting with barbecue cups from Michelle's Meals on a Budget. I went all out and used refrigerated biscuit dough for the full effect :) (hey, nothing wrong with the already made stuff, I just think it's fun to make my own normally!)
They're nice and sloppy, quick, cheap, and easy! I'm certain this would please any kid, and most grown men, too:) It did bring back a little taste of childhood!

Barbecue Cups
makes 12 servings
1 lb ground beef, browned and drained (I used lean ground turkey)
1/2 cup barbecue sauce (took more like 2/3 cup for me; used Sweet Baby Ray's)
1 T dried minced onion, optional (used it!! the only time I can get away with onion is when it's dried:)
1 T brown sugar
1 can refrigerator biscuits (used Pillsbury buttermilk flaky--10 in a can; should have used 12 though)
3/4 cup grated Cheddar cheese
Preheat oven to 400 F.
Mix cooked ground beef with barbecue sauce, onions, and brown sugar.
Grease muffin tins. Flatten biscuits, then press in to cup shape in the tins. Spoon beef mixture into the cups. Top with grated cheese (save some for topping after they bake).
Bake at 400 degrees for 12-14 minutes.

Thursday, September 23, 2010

Mushroom Swiss Sliders with Spicy Fry Sauce

I have probably mentioned this lots of times, but Norris loves mushrooms! They are something I don't really remember eating growing up, and have never gravitated toward, but cook a lot with now that I found my man :)
The Pioneer Woman is forever posting butter-laden dishes that will make you drool, and I don't normally try out many of them even though I love looking at them, but when I saw these, I immediately printed the recipe because I knew I'd have to give them a try in our house! Lauren and Zac also ate with us, and we all liked the flavor combination. I had just a touch of heavy cream left from making s'mores ice cream, so I was glad to use that up. I just bought some rolls and toasted them under the broiler. The "fry sauce" was really great, too!!
For the most part, I followed her instructions, except I cooked the mushrooms and onions separately, then put them in separate bowls on the table so we could each top our own. I cooked the burgers most of the way in the pan, then topped them with cheese and finished them off in the oven, also so they would stay warm. These would also be great in full-size burgers!

Link to Recipe (and you can see her step by step photo instructions!)

Wednesday, September 22, 2010

Cashew Chicken

My menu plan for the week is scattered with fish and deer meat, so I decided I better do a more "normal" chicken one night, too. The Sisters' Cafe girls post lots of great recipes, and I love the idea that all of the sisters contribute recipes to the same site! Melanie submitted this Cashew Chicken, and we both love this dish, so I decided to give it a try.

This wound up being the closest to Chinese kitchen cashew chicken (say that phrase five times fast..whew!) that I have ever had at home! The only change I would make for next time is to add a little more lemon juice and sugar (probably 2 tsp of sugar and 1 tbsp of lemon juice for total amounts). This is a lot better for you than most of those Chinese dinners, too! Add in some veggies and you've got a complete meal!


Cashew Chicken
makes 4 servings
4 chicken breast halves, cut into pieces
1 tsp sugar (would change to 2 tsp)
4 Tbsp cornstarch, divided
1/2 tsp salt (optional--if you're using full sodium soy sauce, you may want to cut this back, depending on your preferences)
1/4 cup soy sauce
1 tsp vinegar
1 tsp Worcestershire sauce
3 Tbsp oil (I used 2 Tbsp)
2 cups hot chicken broth
2 tsp lemon juice (would change to 1 tbsp)
1/2 cup cashews (used about 1/3 cup)
cooked rice (used brown)
Combine sugar, 2 Tbsp cornstarch, salt, soy sauce, vinegar, and W sauce. Dredge chicken pieces in this mixture. Drain and save the dredge.
Heat oil in wok or medium saucepan over medium high heat. Stir fry chicken in pan for about 10 minutes, or until light brown and tender.
Meanwhile, add in the remaining 2 Tbsp to your dredge mixture and whisk well to combine.
Remove chicken from oil and drain excess oil from pan.
While pan is off heat, pour in leftover dredge/cornstarch mixture and stir again. Put back on medium low heat and add in hot chicken broth. Whisk quickly to combine, then turn heat up to bring mixture to a boil, stirring constantly. Cook until thickened.
Add lemon juice and stir. Add chicken pieces and reheat, but do not boil. Taste and adjust seasonings as necessary.
Add in cashews (I just sprinkled over top at the end because I don't like them to already be in the leftovers!). Serve over hot rice.

Tuesday, September 21, 2010

Banana Bread

Or, as my cousin Amber says, this bread is banana, B-A-N-A-N-A-S!! :)

For some reason, I buy bananas almost every week and rarely eat them plain. I put frozen banana chunks into the smoothies I make a few times a week for breakfast, but only really eat a banana once a week or so, so I always wind up with more ripe bananas in the fridge. This should serve as my "note to self" for next week's grocery list!!
It's in my eventual plan to make banana soft serve, but banana bread sounded better at the moment, mainly because I knew we would want a carb-y side with our chicken salads that night! I got this from Amber's blog, and I really really liked it. It has simple ingredients and good flavor. You could add in chocolate chips, nuts, etc., but I liked it just as is!


Banana Bread
4 ripe bananas, mashed
1/3 cup melted butter (Amber used Smart Balance and it worked for her!)
1 cup sugar (can easily be reduced to 3/4 cup--I used 1/2 cup sugar and 1/4 cup Splenda)
1 t vanilla
1 egg, beaten
1 t baking soda
pinch of salt
1 1/2 cup all purpose flour
Preheat oven to 350 F. With a wooden spoon, mix butter into the mashed bananas in a large mixing bowl. Mix in the sugar, egg, and vanilla. Sprinkle the baking soda and salt over the mixture and mix in. Mix in the flour. Pour mixture into a greased loaf pan and bake for ~55 minutes. Cool on rack.

Monday, September 20, 2010

Easy Crockpot Mushroom Chicken

I had parent teacher conferences last week, which means work days from 7-7. I know, that's a regular day for some of you, but a meeting in the morning followed by a day of teaching, making and serving the parent meal for 500 over two days, and some conferences, I'm not in the mood to cook when I get home! I put this in the crockpot before I left for work, and the last bits were being consumed when I got home. Sign of success!!
Norris didn't take a picture :) but this is a simple dish to make--he served it with corn.
This is from the Fix It and Forget It cookbook.

Crockpot Mushroom Chicken

6 boneless, skinless frozen chicken breast halves
2- 10.75 oz cans cream of chicken or cream of mushroom soup (I used one of each)
1/2 cup sliced fresh mushrooms ( I used close to 1 cup)
3/4 tsp salt
1/4 tsp peppers

Place frozen chicken in slow cooker. Mix together soup, mushrooms, salt, and pepper and pour over chicken.
Cover and cook on low for 10-12 hours.

Wednesday, September 15, 2010

Shrimp Pasta with Cilantro Lime Pesto

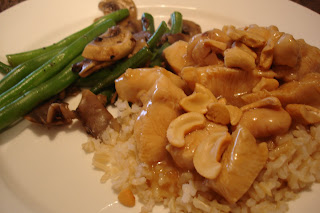
I know I keep saying this, but this was another AWESOME dish!
When I did my menu plan last week, I planned on a fairly cool week so I had a shrimp soup planned. I got home from work sweating and knew soup would not cut it that night. I almost always stick to my menu plan, but I found myself searching for something to use similar ingredients, but not in soup form.
I love pesto, so I was excited to see a cilantro pesto, plus it had shrimp and feta in it, so I was sold! Norris and I both loved this dinner, and he doesn't even normally like meals with a lot of fresh herbs. I sprinkled the feta and crushed red pepper flakes on top, and the flavors blended perfectly. I would encourage you to try this very soon!!
**(two hours after the original post): Woah!! I just went to my cousin Amber's blog to print off her banana bread recipe, and I saw this recipe is at the top of her page!! I remembered seeing it somewhere before finding it through random search, and what a great source it is!!


Shrimp Pasta with Cilantro Lime Pesto

from Bon Appetit, July 2010 as seen on Erin's Food Files

1 1/4 cups packed fresh cilantro leaves, plus 1/4 cup chopped (I used a bit more than this in the pesto portion of the recipe)
1/4 cup chopped green onions (used about 3 Tbsp chopped chives, since they were growing in the herb pot!)
3 Tbsp fresh lime juice
2 garlic cloves, pressed
1 tbsp chopped seeded jalapeno chile (didn't have one, so used a little cayenne pepper instead)
1/2 cup plus 1 Tbsp olive oil
1 lb pasta (used whole wheat thin spaghetti)
1 lb uncooked medium shrimp, peeled and deveined
3 tbsp tequila (used reduced chicken broth instead)
1/4 cup crumbled Cotija or feta cheese (used feta!!)
red pepper flakes (optional)

Blend 1 1/4 cups cilantro leaves, garlic, green onions, lime juice and jalapeno chile in food processor until blended. With motor running, slowly pour in olive oil and blend. Season with salt.
(can make pesto a day ahead of time--store in fridge)
Cook pasta according to package directions.
While pasta cooks, heat 1 tbsp olive oil in saute pan over medium high heat. Add shrimp and cook until almost cooked through, about 3 minutes. Remove skillet from heat and add tequila (or chicken broth!). Return skillet to heat and stir until sauce is syrupy or about 30 seconds. Add pesto, stir to coat, and remove from heat.
Stir pasta into shrimp mixture. Divide into bowls and top with cheese, cilantro and red pepper flakes.
adapted from Tejas Texas Grill and Saloon

Tuesday, September 14, 2010

Almond Crusted Chicken with Balsamic Drizzle

I looooooved this meal! Another winner from LovestoEat, a (mostly) clean eating blog that I get a lot of great recipes from. I also loooooove balsamic vinegar, so it made sense that I would like this drizzle. This chicken was great on a small bed of whole wheat couscous with a few feta crumbles tossed in. I drizzled the sauce over the top of everything and really enjoyed all the flavors combined. It's great for you also--very close to "clean" eating!
Almond Crusted Chicken with Balsamic Drizzle


Ingredients:

1 egg white
1/2 cup almonds, finely chopped
1/3 cup panko crumbs
1 tsp Italian seasoning
1/2 tsp salt
3 boneless, skinless chicken breasts (I used 12 tenderloins)
1/2 cup fresh squeezed orange juice
1/2 cup balsamic vinegar
1.5 tablespoons honey

Directions:
Preheat oven to 425.
Coat baking sheet with baking spray.
Pour egg white into small bowl.
In a shallow plate or bowl, combine almonds, bread crumbs, Italian seasoning, and salt. Mix together.
Dip chicken into egg and shake off any excess.
Roll chicken in almond/breadcrumb mixture to coat.
Place chicken on baking sheet. Repeat for remaining chicken. Coat chicken with nonstick cooking spray.
Bake about 6 minutes on each side (for tenderloinds), coating chicken with cooking spray when you flip it.
While chicken is baking, combine orange juice, balsamic vinegar and honey into small saucepan over medium/high heat. Bring to boil and let boil for about ten minutes, or until sauce reduces by about half. Serve sauce either over or under chicken.

Monday, September 13, 2010

Pizza Pizza Pizza!!

We had a pizza night while Anika was visiting. We made THREE big pizzas--a turkey pepp and mushroom, a turkey pepp, and this one, which was definitely the best! Roasted red peppers, goat cheese, wilted spinach, and seasoned olive oil. Yummmmm!!

Friday, September 10, 2010

S'mores Ice Cream

Unfortunately, this is another dish I didn't get a photo of before it was devoured. Oh well--I was busy having fun and didn't really care to take a picture of food instead!!
This recipe is from Tasty Kitchen (from the Pioneer Woman's site) and you can see a picture there if you'd like! I read the review and adjusted my recipe accordingly, so I will list my adjusted recipe below.
This ice cream had a texture that everyone was describing as similar to Cool Whip, which I guess is because it was marshmallow flavored and had lots of marshmallows in it! I thought it was best with a drizzle of chocolate sauce because it was missing the chocolate flavor that is so important in good s'mores. I think it would be great with a fudge ribbon throughout it if I make it again!
Go ahead, have s'more!! But how can I have s'more if I haven't had any yet?? (reminiscing on the great childhood movie, the Sandlot!!)

S'mores Ice Cream
10.5 oz marshmallows (if you use large, chop them up to melt faster)
1 1/2 cup heavy cream
1 cup milk (you can use 2% instead of whole milk)
2 tsp vanilla
4.4 oz Hershey's chocolate bar, cut into chunks
4 full graham cracker sheets, broken into chunks
Combine marshmallows, cream, and milk over medium heat and stir constantly until marshmallows have melted into the cream and the mixture has become thick.
Remove from heat and stir in vanilla.
Allow to cool for about 30 minutes, then pour into ice cream maker. Churn for ~35 minutes. Carefully fold in the chocolate chunks, then the graham crackers. Eat immediately or place in freezer for harder consistency.

Thursday, September 9, 2010

Mango Pepper Salsa

Continuing with our Mexican fiesta on Sunday, I made some chicken quesadillas with a mango pepper salsa to top them. The quesadillas weren't anything exciting, but the salsa was excellent!
Bonnie has made something similar to this before, but I couldn't remember what she put in it. I went searching and the National Mango Board (as well as lots of other sites) had a great recipe for mango salsa! This is so fresh and cool tasting and goes great with a spicy quesadilla!

Mango Pepper Salsa
1 mango, chopped
1/2 red bell pepper, chopped
~2 tsp lime juice
salt and pepper to taste
~2 tbsp cilantro, minced
~1 tsp jalapeno, minced (optional)
dash of cumin
Combine all ingredients and refrigerate until ready to use.

Wednesday, September 8, 2010

Beef Enchiladas

I know, how many different enchilada recipes can one person post?


We were having a "fiesta" on Sunday night in honor of Anika's first night in town, and I wanted to make some things I could have done ahead of time, so I put together some simple enchiladas. Norris had bought a couple of cans of cream of mushroom soup (don't ask why because I don't know either!) so I decided to put that in the sauce since I remember seeing that in some recipes before. I thought these were really great and had wonderful flavor, and I think our dinner guests agreed!!

No picture--I took one and posted it here, but then I realized it would definitely beat out any former contenders for worst picture ever, and you can hardly even tell what the picture was of. You'll just have to picture an enchilada in your head.

One of the best parts about this recipe is that you can assemble the whole thing the day (or month!) before and store it in the fridge (or freezer please if you are saving them for a month:) until you are ready to bake! Bake straight from the fridge or from frozen--place them in the oven BEFORE you turn it on if you are baking them in a cold glass pan.


Beef Enchiladas

1 lb lean ground beef
1 lb lean ground turkey
~1/4 to 1/3 cup taco seasoning
1/2 onion, small diced (optional..of course I left that out so the boys would eat it!)
3 cups shredded cheese

flour or corn tortillas (I made 10 large flour tortillas plus 6 small corn tortillas' worth)

16 oz enchilada sauce
16 oz cream of mushroom soup

Cook meat with onion; drain fat. Stir in taco seasoning and 2/3 cup water. Bring to boil, then reduce to simmer for 15 minutes.
Warm tortillas so they are easy to roll, then fill each tortilla with meat and a sprinkle of cheese. Place seam side down in greased baking dish. Continue process until all tortillas are filled or the pan is full! Combine enchilada sauce and mushroom soup in bowl, then pour over the top. Sprinkle with remaining cheese.

Bake at 350 covered for 30 minutes, then uncovered for another 15. The sauce should look baked into the tortillas and the cheese slightly golden brown.

Monday, September 6, 2010

Fruity Cinnamon Rolls


I am warning you--if you read this, you might wind up with flour all over your face and glaze on your chin by the end of the evening! (or 2 days, however you choose to make yours)
These were awesome!! As I said before, we have Anika in town, and I wanted to make a few special things, so I decided to try a blueberry bread with some blueberries I had in the fridge. I searched for a while and found Annie's Eats version of blueberry cinnamon rolls, and they are amaaaazing! There is a little lemon zest in the dough and then zest and juice in the glaze, which just brighten up the flavor and combine so well with the fruit. I didn't have enough blueberries, so I subbed in some strawberries, which were also excellent! Even Norris liked them after he got over the initial shock that I didn't make my regular cinnamon rolls :)
The fruit practically turns into jam when baked, which was another added bonus. Try these soon!!


Fruit Filled Cinnamon Rolls

Yield: 12 rolls


for the rolls:

6 1/2 tbsp sugar, divided

1 tsp salt

5 1/2 tbsp unsalted butter, at room temperature

1 large egg

1 tsp lemon zest

3 1/2-4 cups bread flour

2 tsp instant yeast

1 cup plus 3 tbsp milk, at room temperature (I used 2%)

for the filling:

1/4 cup sugar

1 tsp ground cinnamon

1 1/2 cups fresh fruit (I used blueberries and chopped strawberries)

~3 tbsp softened butter or margarine


for the glaze:

3 cups powdered sugar

1 tbsp lemon juice

~6 tbsp milk

1 tsp lemon zest


Directions:

Sprinkle yeast and 1 tbsp sugar over milk and set aside.

Cream together sugar, salt, and butter on medium high speed. Mix in the egg and lemon zest.

Mix in yeast/milk mixture and flour until a dough forms. Once you have a dough, turn it out onto a floured surface and knead for about 10 minutes. When you hold your dough up from both ends, it should sag but not come apart. (That's how you know the gluten strands have developed enough). It should be smooth and tacky (not sticky!). It might take a little extra flour or liquid during your kneading to get it to that point. It typically takes me at least an extra 1/2 cup of flour to get there.
Place in oiled bowl and turn once to coat. Cover with plastic wrap and set in warm spot to rise for about two hours OR put it in your refrigerator overnight and continue work the next day.

Spray a work surface with nonstick cooking spray and dust lightly with flour. Turn dough out, knead a few times, and let rest about fifteen minutes. Come back to it and roll it out to a 9x18 rectangle.

Spread melted butter or margarine over the dough. Combine cinnamon and sugar in a bowl and sprinkle evenly over the dough. Sprinkle the berries evenly across the dough.

Starting on the wide end of your rectangle, roll your dough into the actual cinnamon rolls. I had to roll these a tiny bit looser than I normally roll cinnamon rolls just because of the bulk of the blueberries. Seal the edge by using a bit of water--rub the water over the edge and it will work like gluey magic!!

Cut your rolls about 1.5 inches thick and place in sprayed baking dish about 1.5 inches apart from each other. Cover with towel and let rise in warm place for another 1.5 hours OR cover with plastic wrap and return to refrigerator until the next day!

Preheat oven to 350. Bake rolls (if you refrigerated them, take them out about 30 minutes before baking to come to room temp) for about 35 minutes, or until lightly golden brown on top.

Combine glaze ingredients after you pull rolls out of oven. Allow rolls to cool for about 10 minutes, then glaze them. Devour!!
from Annie's Eats

My other "sister"

I have some great recipes to share with you, but I have something way more important going on this week!! Anika is here to spend a week with us!! Markus was our exchange student TEN YEARS ago (wow!) from Germany. We have kept in touch and even went to stay with his family five years ago. He and his mom visited us a few years ago at my parents', and now his sister Anika is here!! We were really blessed when we got Markus as an exchange student because we really gained another part to our family.

Saturday, September 4, 2010

Oatmeal Peanut Butter Cookies

Now that we are in the third week of school, I finally feel like I have a routine down (although I still am completely exhausted and asleep by 7:30 one night a week...always am in the first few weeks of school!). This leaves me some more time and energy to try out some new recipes, which I have been doing this week, but not documenting much!
I don't share every single recipe I try...if I don't like them, I don't have a good reason to share them! I made a tzaziki sauce this week that was definitely not anything I would make again, but if you have a great recipe for it, I'd love to see it! Norris likes me to make pizza once a week, so I try to throw it in at least once every two weeks as a compromise! I also made creamy taco mac this week, which is a great healthier alternative to Hamburger Helper. I liked it better the next day once the flavors had time to hang out together more. It incorporates low fat cream cheese, low fat sour cream, whole wheat pasta, and lean ground turkey for a meal you can feel good about eating!
After you eat all those better-for-you ingredients, you can switch to this butter/sugar/peanut butter combo: oatmeal peanut butter cookies! I thought about making no-bakes, but then decided I wanted something different. I found these cookies from The Leland House in Durango, CO. and really liked them! I like the peanut butter and oats mixed with the slightest hint of cinnamon. This makes 48 cookies, so I just made half of a recipe. You could always freeze the dough balls and have something to bake later.
Oatmeal Peanut Butter Cookies


1 cup butter
2 cups brown sugar
3 eggs
2 tsp vanilla
2 cup peanut butter
2 cups flour
2 cups oats
1 tsp baking soda
1/2 tsp cinnamon
1/2 tsp salt

Preheat oven to 350 F.
Cream butter and brown sugar. Add eggs, vanilla, and peanut butter. Add in dry ingredients.
Chill dough for 30 minutes to an hour (overnight is fine if you don't have the time!). * The original recipe doesn't call for this, but I just about always chill my dough before baking.*
Bake for 10 to 12 minutes or until golden brown. (mine took exactly 11)